Recap🔗
It's been a while, hasn't it? The last post in this series was back in March of 2016. Let's start off with a little refresher, shall we?
- Part 1 - In which we introduce PowerShell , encourage Windows 10 upgrades, and adopt Chocolatey.
- Part 2 - In which we supercharge Git, fix console selection and copy/paste, and introduce ConEmu and friends.
- Part 3 - You are here
Part Three: Native SSH, pwsh and WSL🔗
On today's agenda, we have alphabet soup, a lot of interesting acronyms. By the end of it, we'll have explored migrating to the new native SSH included in Windows 10's April 2018 release, migrating to PowerShell Core 6.0 (aka pwsh), and the shiny Windows Subsystem for Linux (aka Bash-on-Windows).
Let's get started!
Native SSH🔗
As of the April 2018, Windows 10 (Build 17134) includes native OpenSSH executables. By default, only the client is installed, but the server is available as well. This is sufficient for Git! Read on if you'd like to install the server, which will allow to remotely access your computer via another computer's command line.
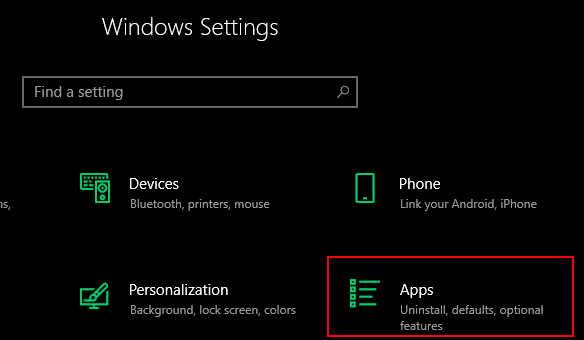
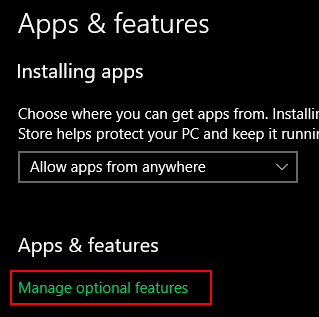
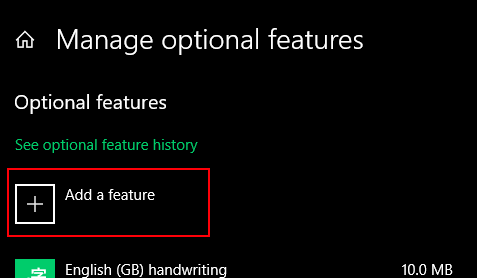
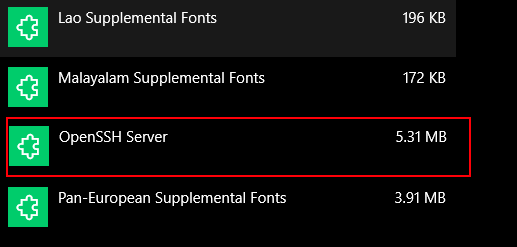
In order to install the server, you can just go to Settings -> Apps -> Manage optional features -> Add a feature -> OpenSSH Server.
 (if you'd like to make sure your OpenSSH Client is installed, scroll down on this page. It should be listed!)
Note that these are also available in the October 2017 update (Build 16299) in Beta form.
As an interesting side note, the Windows port of OpenSSH is being conducted in the open by Microsoft. They also have a tracking PR open in the main repo to (possibly!) integrate their changes back into mainline.
The implications of this are threefold:
1.) Native SSH! No more need for PuTTY for remoting into a Linux box! Now you can just ssh [email protected] from cmd.exe or PowerShell, and it'll work!
2.) ssh-agent now works as a proper Windows Service. No more relying on posh-git's Start-SshAgent, or being constantly nagged for git credentials.
3.) If you installed the server, your Windows machine can now be remotely managed via SSH! (This is a big one for me. SSH is waaaay easier than RDP for a lot of tasks.)
All this shiny goodness comes with a number of caveats. I had to make a number of small tweaks and fixes to get it working correctly the way I expected it to.
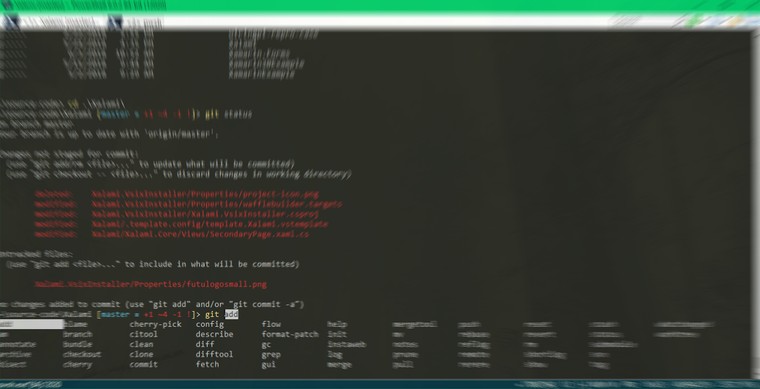
Fixing Git🔗
By default, Git for Windows ships its own port of OpenSSH. We want to configure it to use the shiny new native version of OpenSSH, so we'll have to tell it where to look. In order to do that, we need to set the core.sshcommand setting in our gitconfig. The easiest way to do that is to find out where your instance of git is sourcing its settings from, then go change that file.
> git config --list --show-origin
This will give you a listing of all your git configuration settings, and the files they come from. You'll probably have a .gitconfig somewhere under your user folder (mine was at C:\Users\nmca\.gitconfig, for example). Then, it's just a matter of adding this little section to your .gitconfig file:
[core]
    # If your Windows installation is on some drive other than C:\, adjust as necessary.
    sshCommand = \"C:/Windows/System32/OpenSSH/ssh.exe\"
Now Git will use that command every time it needs to invoke ssh.
If, for whatever reason, you can't modify your git config, you can also set the GIT_SSH environment variable to point at the executable that you'd like Git to run when invoking SSH commands. Note, however, that you can't give it arguments.
Fixing ssh-agent🔗
If you're using posh-git or Git for Windows, you're almost certainly using the ssh-agent that Git for Windows ships. (Although, glancing at posh-git's source, if you're using Pageant, it will try to use that first.).
We don't want this! We want to use our shiny new native ssh-agent! There are a few things we need to do to make sure this happens.
Fixing its Startup Type🔗
For some reason, after performing a Windows Update, the ssh-agent isn't always configured to start automatically. Let's make sure that it is!
First, let's make sure to kill any other running instances of ssh-agent:
# If you're using posh-git:
> Stop-SshAgent

# Kill the running daemon itself
> ssh-agent -k
Now, open up an administrative PowerShell prompt, and we'll configure the Windows service to start automatically. (You can do this through the services.msc UI--look for "OpenSSH Authentication Agent"--as well, but you probably already have a console open anyway):
> Stop-Service ssh-agent
> Set-Service ssh-agent -StartupType Automatic
> Start-Service ssh-agent

# Now, let's check to see if it worked...
> Get-Service ssh-agent | Format-Table -Property Status, Name, DisplayName, StartType

Status      Name        DisplayName                     StartType
------      ----        -----------                     ---------
Running     ssh-agent   OpenSSH Authentication Agent    Automatic

# Success!
Now the native ssh-agent should automatically start up on system start! Note that you may have to do this after future Windows Updates.
One final thing you might have to do: older versions of posh-git automatically run Start-SshAgent on PowerShell startup. You'll want to check your PowerShell profile (check the $Profile variable in a PowerShell console). If the only reference to posh-git is Import-Module posh-git, you're fine. If your profile imports an example profile with a line something like . C:\tools\poshgit\dahlbyk-posh-git-464601f\profile.example.ps1, you'll want to go track down that example profile, and make sure it doesn't call Start-SshAgent.
Fixing your private key's permissions🔗
If you're like me, the permissions on your SSH identity's private key file are probably too permissive. The new native OpenSSH client will complain very loudly about it, and say something like this:
@@@@@@@@@@@@@@@@@@@@@@@@@@@@@@@@@@@@@@@@@@@@@@@@@@@@@@@@@@@
@         WARNING: UNPROTECTED PRIVATE KEY FILE!          @
@@@@@@@@@@@@@@@@@@@@@@@@@@@@@@@@@@@@@@@@@@@@@@@@@@@@@@@@@@@
Permissions for 'C:\\<your private key file>' are too open.
It is required that your private key files are NOT accessible by others.
This private key will be ignored.
Load key "C:\\<your private key file>": bad permissions
[email protected]: Permission denied (publickey).
fatal: Could not read from remote repository.
In that case, you'll want to find your private key, right-click it, go to Properties, the Security tab, and click on Advanced.
Then, click on "Disable Inheritance". In the dialog that pops up, you want to Remove all inherited permissions.
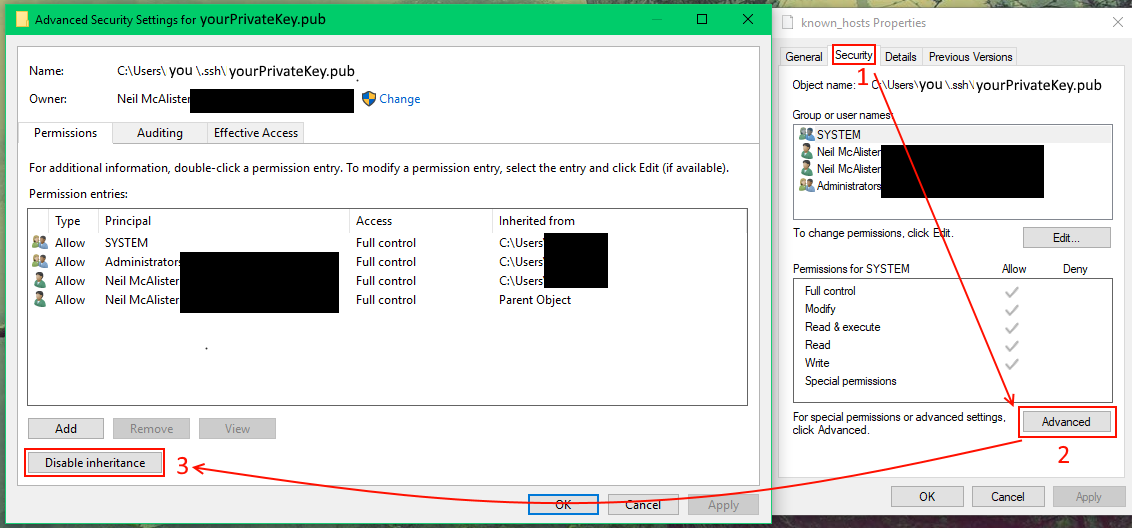
Next, click "Add", and in the window that appears, click "Select a principal". Enter your username in the text box at the bottom of the window, then click "Check Names" to validate your entry. It should autofill any missing details (usually the computer domain name). Click OK. Click the "Full Control" checkbox. Click OK. Continue clicking OK until you've escaped from nested dialog hell.
Success!
pwsh, A.K.A. PowerShell Core🔗
We live in a strange new world. Microsoft owns GitHub. .NET is open source and cross-platform. Linux runs on Windows. One of the lesser-known examples of cats-and-dogs-living together is what happened in the shift from PowerShell 5.0 to PowerShell 6.0. Now, instead of sitting on top of the .NET Framework, PowerShell 6.0 sits on top of .NET Core! It's called PowerShell Core, it's cross-platform, and it's available right now. The PowerShell team has also said that all future development will focus on PowerShell Core, so not only is it officially-supported, it is The Future(tm).
So, in short, unless you're using something that explicitly depends on the full .NET Framework (and that doesn't exist in .NET Core), or a Windows-specific piece of PowerShell functionality, you should consider switching!
Getting started is super easy. Personally, I prefer using Chocolatey (as introduced in the first post in this series), because all I have to do is
choco install powershell-core
...and done. There are a few arguments that can be passed to the installer, as documented on the package's gallery page.
If you're not into package managers, you can just download the official installers.
Migrating your $PSProfile and modules🔗
By default, pwsh has a slightly different profile location than Ye Olde PowerShell. pwsh's profile lives in C:\Users\<username>\Documents\PowerShell\Microsoft.PowerShell_profile.ps1 by default, whereas Ye Olde PowerShell's profile lives in C:\Users\<username>\Documents\WindowsPowerShell\Microsoft.PowerShell_profile.ps1.
The easiest way to migrate is to just copy-paste, and then spend a little bit of time making sure that everything works.
You will have to migrate your modules, as pwsh uses a different $PSModulePath. You have two options--reinstall the modules entirely, or, uses the Windows Comaptibility Module, which will give you the ability to add the old Windows $PSModulePath to pwsh's $PSModulePath. To install it, you can just
Install-Module WindowsCompatibility -Scope CurrentUser
...which then gives you access to a few cmdlets that allow you to import or use Ye Olde PowerShell things, like the Import-WinModule cmdlet.
Or, if you're like me and didn't realize that the WindowsCompatibility module exists, you can symlink your modules individually from the old module path to the new one.
...don't do that.
Migrating your usage habits🔗
There's no way to reroute a few system shortcuts that point to PowerShell (the right-click menu on the Start button comes to mind) without some registry hacking, but you can replace all your taskbar pins, Start menu pins, etc.
You might need to add the pwsh.exe directory to your PATH. By default, it's C:\Program Files\PowerShell\x.x.x, where x.x is your pwsh version. Mine is 6.0.2 at the moment, for example.
I set up ConEmu to use a non-administrative pwsh as its default console, for example. Here's what the Administrative pwsh ConEmu Task looks like:
Now regular pwsh is a Ctrl + T away, and Admin-pwsh a Ctrl + Shift + T. Easy!
WSL aka Bash on Windows🔗
The Windows Subsystem for Linux, or WSL, or sometimes just Bash on Windows, is a way of running a Linux CLI environment in Windows without a virtual machine. It's a full, actual Linux distribution, capable of running any Linux binary. I've even heard tales of people running full X servers and getting a desktop environment functional, but I haven't seen it firsthand.
Note that this only works on Windows 10, version 1607 (aka the Anniversary Update) or later.

Enabling WSL🔗
Microsoft has a good guide for getting up and running, but the short version is:
1) From an Administrative PowerShell, run Enable-WindowsOptionalFeature -Online -FeatureName Microsoft-Windows-Subsystem-Linux
2) Reboot.
3) If on the Fall Update or later, download the Linux distribution of your choice from the Windows Store. The default, and best-supported distro is Ubuntu.
or
Once that's done, all you have to do is either a) Find the intsalled distro in your list of all apps in the Start menu, or b) From any command line shell, just type bash!
Congratulations, you now have full access to the wide world of Linux CLI tooling, all without needing to reboot or spin up a VM.
Do note that there are a few caveats, and a major one is that you should not modify files under the Linux filesystem from Windows.
Wrapping up🔗
Now we're cooking. We've got native ssh (and friends!), a shiny new open-source, .NET Core-powered PowerShell, and if we really need it, the ability to drop down into a fully-fledged Linux CLI environment.
Between all of the improvements listed in this, and the previous parts of the series, I can confidently say that we now genuinely have a saner Windows command line. Hope it's been a useful journey to any readers as well!
As always, feel free to leave comments or feedback on Twitter (@pingzingy) and Github (pingzing)!

This work is licensed under a Creative Commons Attribution 4.0 International License.
Edited April 15, 2020 to fix a minor error in the SSH section